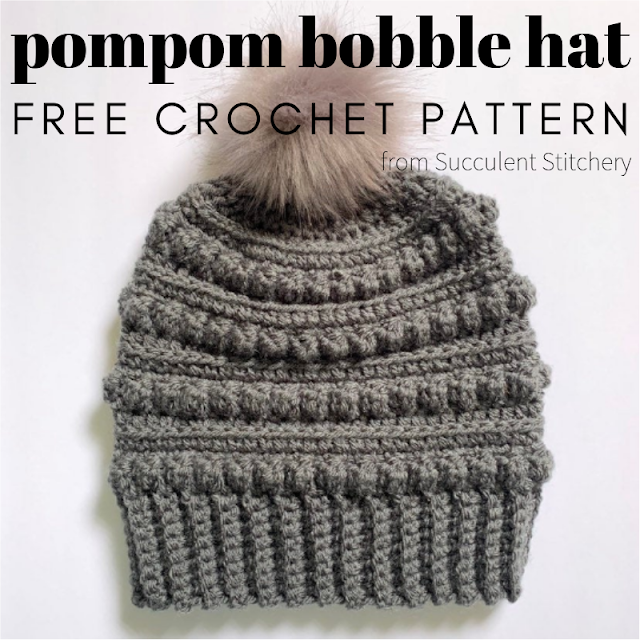
Free Crochet Pattern: Pompom Bobble Hat
If you've looked at anything crochet-related online lately, you have no doubt seen some type of pompom bobble hat. They're insanely popular, and for good reason: they're textured and interesting, but still neutral enough to go with almost any outfit. Plus, they're addicting to make!
You will need:
I come up with lots of different types of pompom bobble hats for my shop, but this is my favorite pattern, so I decided to share it with you for free!
You will need:
- Worsted weight yarn in the color of your choice, 1-2 balls. I personally love Lion Brand Vanna's Choice for this pattern. It's affordable, soft and squishy, and shows off the texture of the bobbles very well.
- Crochet hook in 5.5mm (I), or whatever size hook gives you the results you want. I only use hooks with an ergonomic rubber handle (like these) so I can crochet in comfort for hours if I want!
- Yarn needle to weave in ends
- Faux fur pompom (optional...but is it, really?). I get mine here, and I always make sure they're the kind with the little elastic loops because they're the easiest to attach.
Pattern notes:
- This hat is worked from the bottom up, meaning you will crochet the band first, then work the hat before you decrease for the crown and finish by attaching your pompom and weaving in ends.
- This hat is mostly worked in rounds on the right side, but bobbles are formed by turning your work and crocheting on the wrong side.
- To fluff up your pompom before attaching it to your hat, hold it by the little elastic loop and blast it with a hot hair dryer for a minute or so until it looks how you want. Be careful not to burn your fingers!
- This pattern is written to make a hat that fits an average adult-sized head (20-23").
- If you like this pattern and want to sell items you make using it, that's cool! Just make sure to credit me for the pattern and link back to this page, please :)
Abbreviations used:
- bobble st - bobble stitch (3 dc in same stitch)
- ch - chain
- dc - double crochet
- hdc - half-double crochet
- hdc blo - half-double crochet through the back loop only
- hdc2tg - half-double crochet 2 stitches together
- rs - right side
- sc - single crochet
- sc blo - single crochet through the back loop only
- sl st - slip stitch
- st - stitch
- ws - wrong side
Begin here: brim:
- With worsted weight yarn and crochet hook, ch 9
- Sc in second ch from hook and in each ch across; 8 sc
- Ch 1 and turn work, sc blo in same st and each st across; 8 sc
- Repeat #3 until brim measures 17.5" slightly stretched
- To seam brim: ch 1; hold both ends of the brim together with the ch 1 closest to you; sl st through the front loop of the same st and the back loop of the corresponding st on the end farthest from you. Sl st across until brim is formed into a ring; do not cut yarn.
- Flip brim inside out so seam in on inside. Now you're ready to move on to the body of the hat!
Body:
- Ch 1, sc in same stitch and then evenly across edge of brim until you have an even number of stitches; sl st to first sc to complete round. I typically have about 60 stitches by the time I reach the beginning of the round. The number you have does not matter in this pattern as long as it is an even number.
- Turn work to ws, ch 1, sc in same st; bobble st in next st; *sc in next stitch, bobble st in next st,*; repeat from * to * until end of round, sl st to first sc. Turn work back to rs.
- Ch 1, sc in same st and each st around; sl st to first sc.
- Ch 1, hdc in same st and each st around; sl st to first hdc.
- Ch 1, hdc blo in same st and each st around; sl st to first hdc.
- Ch 1, sc in the same st and each st around; sl st to first sc.
- Repeat rounds 2-6 three more times.
Crown:
- Ch 1, hdc2tg same st and next st, hdc in next st; *hdc2tg, hdc,* repeat from * to * until end of round, sl st. to first hdc2tg.
- Repeat round 1 two more times; bind off and cut yarn, leaving a 10" tail.
- Thread yarn needle with tail, thread through each remaining stitch and pull to cinch close top of hat.
Finishing:
- With yarn needle, thread tail through the little elastic loop on your faux fur pompom and pass the needle through the cinched top of your hat. Tie a knot and weave in tail to secure.
- Weave in all other ends. You're done!


Beautiful hat, and I tried to share it to facebook, but they referred to it as spam. I have never seen that happen before. I am not sure why. Just thought I would let you know.
ReplyDeleteCan't wait to get started...thank you for sharing your pattern
ReplyDeleteBeautiful pattern! Worked up quickly. I can't wait to see what you do next. Thank you!
ReplyDelete